Warner Bros. Games Yesterday announced that MultiVersus, the free-to-play platform fighter videogame, has officially launched on PlayStation®5 (PS5™) and PlayStation 4 consoles, Xbox Series X|S, Xbox One consoles, and PC (Steam and Epic Games Store) with full cross-play and cross-progression support.
But it’s been two years and the beta version game was just smooth and players had a great experience but now after the official release MultiVersus unreal engine crashing on startup
and it just has an annoying error for every 1/3 player. In this guide, we’ll assist you.
How to Fix MultiVersus Unreal Engine Crashing on Startup
Here are some steps that have helped a lot of players check it out:
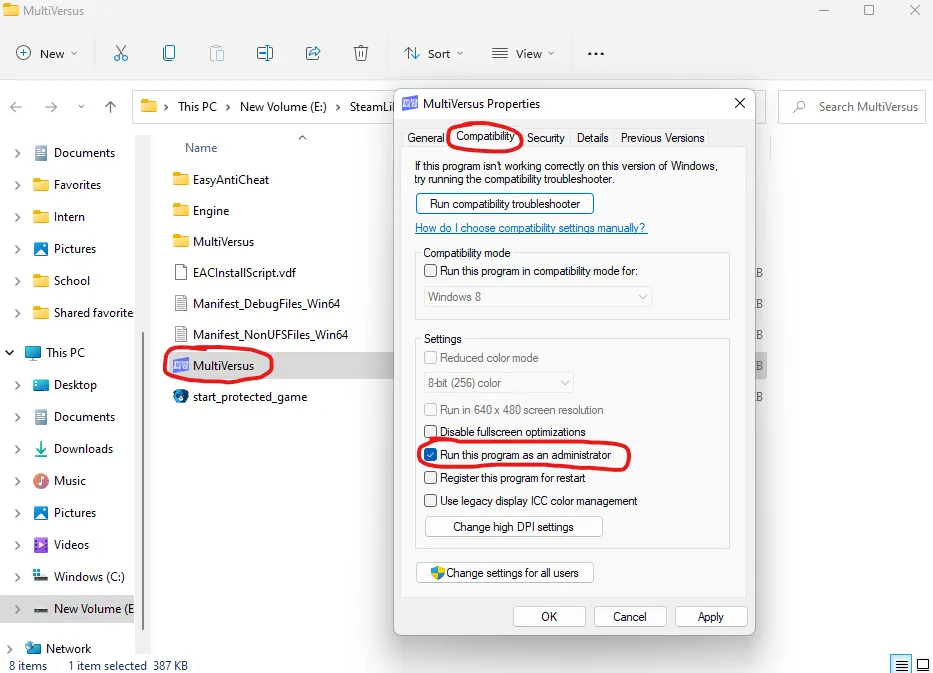
Run as an administrator for MultiVersus
Run Multiversus as an administrator can help to safe the game from crashing on startup and it gives the necessary permissions to access system resources and perform certain actions. It grants access to system files and allows modification to system settings without encountering permissions issues.

Additionally, it bypasses the restrictions that standard user accounts might have and minimizes interference from other applications or background processes. This gives smoother experiences and reduces the chances of crashes
Here are the steps you need to follow:
- Open Steam and go to your Library.
- Right-click MultiVersus and select “Properties…”.
- Select the “Local Files” tab.
- Click on “Browse…”.
- In the file explorer, right-click “MultiVersus”.
- Click on the “Compatibility” tab.
- Tick the checkbox for “Run this program as an administrator”.
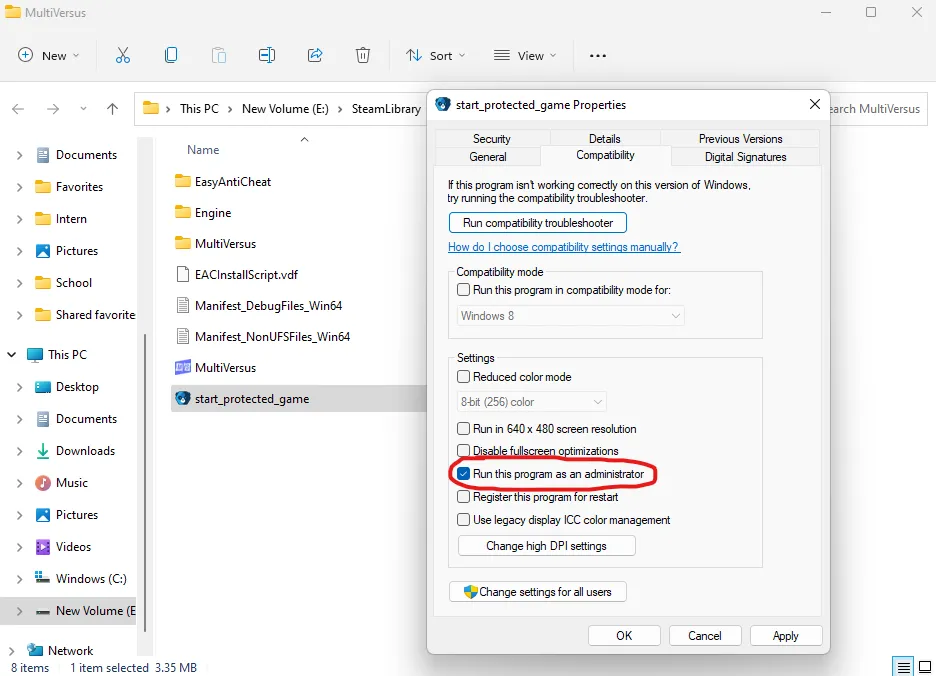
Run as an administrator” for “start_protected_game”
This also works the same as the above method it always gives access to resources of our device.

Here are the steps you need to follow:
- Open Steam and go to your Library.
- Right-click on MultiVersus and select “Properties…”.
- Select the “Local Files” tab.
- Click on “Browse…”.
- In the file explorer, right-click on “start_protected_game”.
- Click on the “Compatibility” tab.
- Tick the checkbox for “Run this program as an administrator”.
Set High Priority
When you set a process to run with high priority, it means your computer will pay more attention to it compared to other tasks. This can make that task run faster and smoother, which might help things like games or programs load quicker and run more smoothly. It’s like telling your computer, “Hey, focus on this thing first!” so it gets done faster.

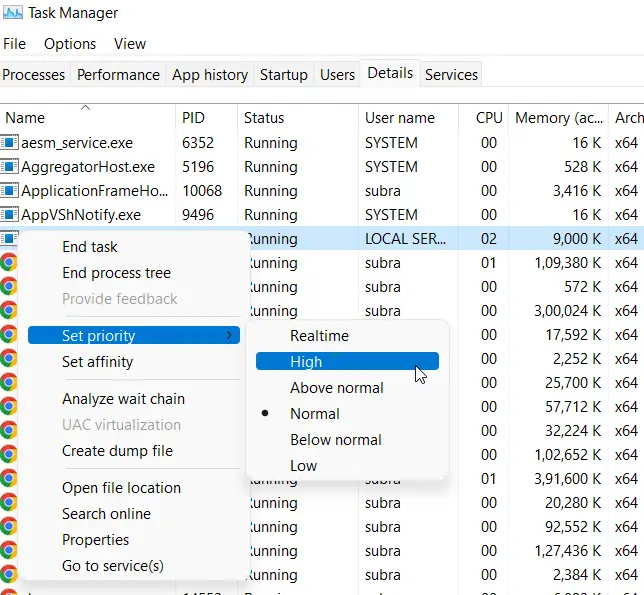
- Open Task Manager: Press Ctrl + Shift + Esc to open Task Manager.
- Find the Process: Go to the “Details” tab and find the process you want to prioritize. Right-click on it and select “Set priority”.
- Select High: From the dropdown menu, select “High”.
- Confirm the Change: If prompted by User Account Control, click “Yes” to confirm the change.


